Image Manipulation: The Basics🤹
Get to understand how to work with docker images 🧠

After learning about the basics of containers, it is time to get to know another important concept in Docker: Images 🖼️
We are going to start with their creation and go up till we are able to share them 📨
To make it easy to follow, it would be best to install Visual Studio Code and the Docker extension. Let's get started.
Creating Images🏗
Creating Docker images involves specifying the configuration and dependencies of your application in a file called a Dockerfile and then using Docker commands to build the image.
Steps to Create a Docker Image:
Understand Your Application:
- Identify the components and dependencies of your application that need to be packaged into the Docker image.
Create a Dockerfile:
- A Dockerfile is a text file that contains instructions for building a Docker image. It specifies the base image, adds application code, sets environment variables, and more.
Example Dockerfile:
    # Use an official Node.js runtime as a base image
    FROM node:lts

    # Set the working directory in the container
    WORKDIR /app

    # Copy package.json and package-lock.json to the working directory
    COPY package*.json ./

    # Install application dependencies
    RUN npm install

    # Copy the application code to the working directory
    COPY . .

    # Expose port 3000
    EXPOSE 3000

    # Define the command to run your application
    CMD ["npm", "start"]
- Understanding Dockerfile Instructions 🧐:
FROM node:lts:Specifies the base image for the Dockerfile. In this case, it's an official Node.js image with the tag
lts. This particular tag corresponds to the Long Term Support (LTS) version. 🔀WORKDIR /app:Sets the working directory inside the container to
/app. Subsequent instructions will be executed from this directory. 💼COPY package*.json ./:Copies files from the host to the container. Here, it copies
package.jsonandpackage-lock.jsonfrom the current directory on the host (where the Dockerfile is located) to the/appdirectory inside the container.RUN npm install:Executes the command
npm installinside the container. This installs the application dependencies based on the information inpackage.jsonandpackage-lock.json🚀COPY . .:Copies the entire content (code) of the current directory on the host to the
/appdirectory inside the container. 🖨️EXPOSE 3000:Informs Docker that the container will use port 3000. This doesn't actually publish the port; it's more of a documentation feature. To publish the port when running the container, you would use the
-poption with thedocker runcommand. 🔓CMD ["npm", "start"]:Specifies the default command to run when the container starts. Here, it's running the command
pnpm start, assuming that yourpackage.jsonhas a corresponding script named "start." This starts the server in development mode.🏃
In summary 📌, this Dockerfile sets up a Node.js environment, sets up the working directory, copies the necessary files, installs application dependencies, exposes a port, and defines the default command to start your application. It's tailored for a Node.js project that uses npm as its package manager.
- Build the Docker image 🛠️:
Use the
docker buildcommand to create an image from the Dockerfile.docker build -t my-node-app .-t: Tags the image with a name (e.g.,my-node-app).docker build -t my-node-app . [+] Building 450.1s (11/11) FINISHED docker:default => [internal] load .dockerignore 0.1s => => transferring context: 2B 0.0s => [internal] load build definition from Dockerfile 0.1s => => transferring dockerfile: 486B 0.0s => [internal] load metadata for docker.io/library/node:lts 11.5s => [auth] library/node:pull token for registry-1.docker.io 0.0s => [internal] load build context 0.1s => => transferring context: 737B 0.0s => [1/5] FROM docker.io/library/node:lts@sha256:fd0115473b293460df5b217ea73ff216928f2b0bb7650c5e7aa56aae4c028426 436.9s => => resolve docker.io/library/node:lts@sha256:fd0115473b293460df5b217ea73ff216928f2b0bb7650c5e7aa56aae4c028426 0.0s => => sha256:fd0115473b293460df5b217ea73ff216928f2b0bb7650c5e7aa56aae4c028426 1.21kB / 1.21kB 0.0s => => sha256:6a299ae9cfd996c1149a699d36cdaa76fa332c8e9d66d6678fa9a231d9ead04c 49.58MB / 49.58MB 113.1s => => sha256:e08e8703b2fb5e50153f792f3192087d26970d262806b397049d61b9a14b3af5 24.05MB / 24.05MB 78.4s => => sha256:68e92d11b04ec0fe48e60d59964704aca234084f87af5d1a068c49456b37fe3d 64.14MB / 64.14MB 226.9s => => sha256:c3e72880014551ecfe631aae3aef14ed33b7e58b4b682f5a398838119da5cdc4 2.00kB / 2.00kB 0.0s => => sha256:723a77f71cf06aeaa21ea74bfc1299e8362d26db488a7fba4e8b744e2d58998e 7.34kB / 7.34kB 0.0s => => sha256:5b9fe7fef9befda786bc8e1dd1ae42ffd8b9c37a4cce3c433e65ebb890cb1672 211.11MB / 211.11MB 423.6s => => sha256:278d467c182fb935287ed6f4be3d44f8ac2714264bcb58b883d0cd25754f75d6 3.37kB / 3.37kB 114.4s => => extracting sha256:6a299ae9cfd996c1149a699d36cdaa76fa332c8e9d66d6678fa9a231d9ead04c 3.5s => => sha256:9b5f63cb30c69fe1a827c8fea9d33bd7026dffa193ed449ff44e1c98189971ff 47.99MB / 47.99MB 243.1s => => extracting sha256:e08e8703b2fb5e50153f792f3192087d26970d262806b397049d61b9a14b3af5 0.7s => => sha256:230542c909b8c810d61434d1f259307fac388dda9d2daca1aaf069c0b68a92ee 2.21MB / 2.21MB 240.2s => => extracting sha256:68e92d11b04ec0fe48e60d59964704aca234084f87af5d1a068c49456b37fe3d 3.4s => => sha256:dc95f2a6ccee7fb934bd659ef134da3e3c71c2a4a8059fe3c79a7d230e653528 450B / 450B 241.8s => => extracting sha256:5b9fe7fef9befda786bc8e1dd1ae42ffd8b9c37a4cce3c433e65ebb890cb1672 9.5s => => extracting sha256:278d467c182fb935287ed6f4be3d44f8ac2714264bcb58b883d0cd25754f75d6 0.0s => => extracting sha256:9b5f63cb30c69fe1a827c8fea9d33bd7026dffa193ed449ff44e1c98189971ff 3.0s => => extracting sha256:230542c909b8c810d61434d1f259307fac388dda9d2daca1aaf069c0b68a92ee 0.1s => => extracting sha256:dc95f2a6ccee7fb934bd659ef134da3e3c71c2a4a8059fe3c79a7d230e653528 0.0s => [2/5] WORKDIR /app 0.4s => [3/5] COPY package*.json ./ 0.1s => [4/5] RUN npm install 1.0s => [5/5] COPY . . 0.1s => exporting to image 0.1s => => exporting layers 0.1s => => writing image sha256:faf35a0141ad4839e8456c6622a864bed196872e4fdb0e95a881d2c1cbfd191e 0.0s => => naming to docker.io/library/my-node-app 0.0s View build details: docker-desktop://dashboard/build/default/default/imq83iyzhkh9jjdg99l91s1bn What's Next? View a summary of image vulnerabilities and recommendations → docker scout quickviewThe
.at the end sets the context for this build. The context means the directory accessible by the daemon during the build process.- Verify the image ✔️.
- Confirm that the image has been created successfully.
    docker images
    REPOSITORY               TAG       IMAGE ID       CREATED          SIZE
    my-node-app              latest    faf35a0141ad   59 seconds ago   1.1GB
    median                   latest    61133e3b2bfc   5 hours ago      714MB
    kalilinux/kali-rolling   latest    8d7fc77f8cee   7 days ago       126MB
    busybox                  latest    3f57d9401f8d   2 weeks ago      4.26MB
    ubuntu                   latest    e34e831650c1   3 weeks ago      77.9MB
    nginx                    latest    a8758716bb6a   3 months ago     187MB
    hello-world              latest    d2c94e258dcb   9 months ago     13.3kB
    postgres                 13.4      113197da0347   2 years ago      371MB
    fhsinchy/hello-dock      latest    f540930e8157   3 years ago      21.9MB
As we can see, it was created successfully.
- Run a container from the image 🚀:
- Use the
docker runcommand to start a container from the created image.
docker run -p 4000:3000 my-node-app
-p: Maps port 4000 on the host to port 3000 in the container and we see the message "Docker is amazing!" in the console of your terminal.The code for the simple app can be found here
    docker run my-node-app
    > my-node-app@1.0.0 start
    > node app.js

    Docker is amazing!
Best Practices 😎:
Keep Images Small 🤏:
- Minimize the number of layers and remove unnecessary files to reduce the image size.
Use .dockerignore 🙈:
- Create a
.dockerignorefile to exclude unnecessary files and directories from being copied into the image.
- Create a
Multi-Stage Builds 🗄️:
- Use multi-stage builds to create a smaller final image by discarding unnecessary build artifacts.
Tagging Images🏷️
In Docker, tagging is the process of assigning a label or identifier to an image. Tags are used to uniquely identify different versions or configurations of an image. They help organize and manage images, making it easier to reference specific versions or variations. A Docker image tag is typically specified using the -t option during the docker build command or when pulling an image from a registry. 🗃️
- Basic Tagging Syntax: 📌
The basic syntax for tagging an image during the build process is as follows:
docker build -t <image_name>:<tag> .For example:
docker build -t my-node-app:latest .
Default Tag: 📂
- If no tag is specified, Docker defaults to the
latesttag.
- If no tag is specified, Docker defaults to the
Using Registries:
When working with Docker registries (such as Docker Hub), the tag often includes the registry URL (more on this later 🔜). For example:
docker build -t username/my-node-app:latest .
Tagging Existing Images:🏷️
You can also tag an existing image using the
docker tagcommand:docker image tag <image id> <image repository>:<image tag> ## or ## docker image tag <image repository>:<image tag> <new image repository>:<new image tag>For example:
docker tag my-node-app:latest my-node-app:v1.0
Use cases and best practices:🥇
Versioning:🏷️
Tags are commonly used for versioning, indicating different releases or iterations of an application.
docker build -t my-node-app:v1.0 .
Environment Tags:🌱
Tags can indicate different environments, such as
productionordevelopment.docker build -t my-node-app:production .
Latest Tag:⚡
While the
latesttag is convenient, it's essential to use versioned tags for production deployments to ensure consistency.docker build -t my-node-app:latest .
Registry Tags:🗃️
When pushing images to a registry, include the registry URL in the tag.
docker build -t registry.example.com/my-node-app:latest .
Immutable Tags:🛑
Consider using immutable tags (e.g., version numbers) to ensure that the same tag always refers to the same image.
docker build -t my-node-app:1.2.3 .
Tagging in Docker is a crucial aspect of managing images, providing a way to uniquely identify and version images. Proper tagging helps maintain consistency, track changes, and facilitate collaboration when sharing images across different environments or with a team. It's good practice to use descriptive and meaningful tags to convey information about the image's purpose or version.🏷️🐳
Listing and removing images📋
Listing images
In Docker, managing images involves listing existing images, inspecting their details, and removing images that are no longer needed. Here, I'll provide an overview of how to list and remove Docker images using the command-line interface.
List all images:
To view a list of all Docker images on your system, you can use the following command:
  docker images
  ## or ##
  docker images ls
This command displays a table with information about each image, including the repository, tag, image ID, creation time, and size.
    docker images
    REPOSITORY               TAG       IMAGE ID       CREATED        SIZE
    my-node-app              latest    faf35a0141ad   18 hours ago   1.1GB
    median                   latest    61133e3b2bfc   23 hours ago   714MB
    kalilinux/kali-rolling   latest    8d7fc77f8cee   8 days ago     126MB
    busybox                  latest    3f57d9401f8d   2 weeks ago    4.26MB
    ubuntu                   latest    e34e831650c1   3 weeks ago    77.9MB
    nginx                    latest    a8758716bb6a   3 months ago   187MB
    hello-world              latest    d2c94e258dcb   9 months ago   13.3kB
    postgres                 13.4      113197da0347   2 years ago    371MB
    fhsinchy/hello-dock      latest    f540930e8157   3 years ago    21.9MB
Filtering Images:
You can use filters to display specific information. For example, to list images with a particular name or repository, you can use:
  docker images <repository_name>
  ## or ##
  docker images --filter "filter"
Replace <repository_name> with the name of the repository you want to filter by.
For example:
    docker images busybox
    REPOSITORY   TAG       IMAGE ID       CREATED       SIZE
    busybox      latest    3f57d9401f8d   2 weeks ago   4.26MB
Removing Images🗑️
Remove by Image ID:🪪
To remove a Docker image by its image ID, use the following command:
docker rmi <image_id>For example:
  docker rmi 3f57d9401f8d
  Untagged: busybox:latest
  Untagged: busybox@sha256:6d9ac9237a84afe1516540f40a0fafdc86859b2141954b4d643af7066d598b74
  Deleted: sha256:3f57d9401f8d42f986df300f0c69192fc41da28ccc8d797829467780db3dd741
  Deleted: sha256:2e112031b4b923a873c8b3d685d48037e4d5ccd967b658743d93a6e56c3064b9
Replace
<image_id>with the actual ID of the image you want to remove. You can find the image ID by runningdocker images.Remove by Image Name and Tag:🏷️
If you prefer, you can use the image name and tag instead of the image ID:
docker rmi <repository_name>:<tag>
Replace <repository_name> and <tag> with the actual repository name and tag you want to remove.
Force Removal:💥
If an image is associated with a running container, you might need to stop and remove the container before deleting the image. Alternatively, you can use the
-foption to force the removal of the image, along with its associated containers:docker rmi -f <image_id>
Be cautious with force removal, as it deletes containers without proper consideration. 🚨
Cleaning Up Unused Images:
Remove Dangling Images: 🧹
Docker images that are not associated with any containers are considered "dangling" or "untagged." You can remove these using the following command:
docker image prune
This command prompts you to confirm the removal of dangling images.
Remove All Unused Images:🚮
To remove all unused images, including dangling images and those not associated with any containers, you can use:
docker image prune -a
Again, this command prompts you to confirm the removal of all unused images.
Understand the many layers of an image🍰
In Docker, an image is composed of multiple layers, each representing a set of filesystem changes or configurations. Understanding these layers is crucial for optimizing image creation, reducing image size, and efficiently utilizing Docker's caching mechanism.
Key Concepts:🗝️
Layered Filesystem: 📂
- Docker uses a layered filesystem, where each layer represents a specific set of changes. When you create an image, each instruction in the Dockerfile adds a new layer.
Immutable Layers: 🛑
- Once a layer is created, it is immutable. This means that any changes to the filesystem result in a new layer being added rather than modifying existing layers.
Caching:💾
- Docker utilizes caching during the image build process. If the instructions in a Dockerfile haven't changed, Docker can reuse the existing layers, significantly speeding up the build process.
Image ID: 🪪
- The unique identifier for an image is derived from the checksum of its layers. If any layer changes, it results in a new image ID.
Why Understanding Layers is Important:📢
Efficient Builds:⚡
- Leveraging Docker's caching mechanism by understanding layers allows for faster builds. Unchanged layers are reused, and only the modified layers are rebuilt.
Reduced image size:✂️
- Each layer adds to the overall size of the image. Optimizing the order of instructions in the Dockerfile and minimizing the number of layers helps reduce the final image size.
Reproducibility:👯
- The immutability of layers ensures that images are reproducible. The same set of layers will always result in the same image, providing consistency across different environments.
Image Versioning:🔖
- When you tag an image with a version, it refers to a specific combination of layers. This makes it easy to manage and version your application releases.
Best Practices for Layer Management:👌
Combine Commands:🔗
Combine multiple commands in a single RUN instruction to reduce the number of layers. For example:
  RUN apt-get update && \
      apt-get install -y package1 package2 && \
      rm -rf /var/lib/apt/lists/*
Layer Ordering:📜
- Order instructions in the Dockerfile from the least likely to change to the most likely to change. This allows Docker to reuse more layers during caching.
Minimize layer size:🔻
- Keep the size of each layer to a minimum. Remove unnecessary files and dependencies after they are used.
Example:
Consider the following Dockerfile:
# Dockerfile

FROM ubuntu

RUN apt-get update && apt-get install -y \
    package1 \
    package2 \
    && rm -rf /var/lib/apt/lists/*

COPY . /app
- This Dockerfile has two main layers: one for installing packages and another for copying the application code. If the packages don't change frequently, Docker can cache the first layer during subsequent builds, making the process faster.
Visualizing the layers of an image👀
The docker image history command displays the history of an image, showing the layers that make up the image, along with the commands used to create each layer. Let's analyze the output for your my-node-app Docker image:
docker image history my-node-app
IMAGE          CREATED        CREATED BY                                      SIZE      COMMENT
faf35a0141ad   19 hours ago   CMD ["npm" "start"]                             0B        buildkit.dockerfile.v0
<missing>      19 hours ago   EXPOSE map[3000/tcp:{}]                         0B        buildkit.dockerfile.v0
<missing>      19 hours ago   COPY . . # buildkit                             622B      buildkit.dockerfile.v0
<missing>      19 hours ago   RUN /bin/sh -c npm install # buildkit           2.88kB    buildkit.dockerfile.v0
<missing>      19 hours ago   COPY package*.json ./ # buildkit                114B      buildkit.dockerfile.v0
<missing>      19 hours ago   WORKDIR /app                                    0B        buildkit.dockerfile.v0
<missing>      4 days ago     /bin/sh -c #(nop)  CMD ["node"]                 0B
<missing>      4 days ago     /bin/sh -c #(nop)  ENTRYPOINT ["docker-entry…   0B
<missing>      4 days ago     /bin/sh -c #(nop) COPY file:4d192565a7220e13…   388B
<missing>      4 days ago     /bin/sh -c set -ex   && export GNUPGHOME="$(…   7.52MB
<missing>      4 days ago     /bin/sh -c #(nop)  ENV YARN_VERSION=1.22.19     0B
<missing>      4 days ago     /bin/sh -c ARCH= && dpkgArch="$(dpkg --print…   161MB
<missing>      4 days ago     /bin/sh -c #(nop)  ENV NODE_VERSION=20.11.0     0B
<missing>      4 days ago     /bin/sh -c groupadd --gid 1000 node   && use…   8.94kB
<missing>      4 days ago     /bin/sh -c set -ex;  apt-get update;  apt-ge…   587MB
<missing>      4 days ago     /bin/sh -c set -eux;  apt-get update;  apt-g…   177MB
<missing>      4 days ago     /bin/sh -c set -eux;  apt-get update;  apt-g…   48.4MB
<missing>      4 days ago     /bin/sh -c #(nop)  CMD ["bash"]                 0B
<missing>      4 days ago     /bin/sh -c #(nop) ADD file:6d9e71f0d3afb0b28…   117MB
Here's a breakdown of the output:
CMD ["npm", "start"] (Layer 7):
- This layer sets the default command to run the application using npm. It doesn't add any size to the image as it is metadata.
EXPOSE map[3000/tcp:{}] (Layer 6):
- This layer exposes port 3000. Like the CMD layer, it's metadata and doesn't add to the image size.
COPY . . # buildkit (Layer 5):
- This layer copies the application code into the container. The comment indicates that it's part of the build process using BuildKit. The size of this layer is 622B.
RUN /bin/sh -c npm install # buildkit (Layer 4):
- This layer installs application dependencies using npm. The comment indicates that it's part of the build process using BuildKit. The size of this layer is 2.88 kB.
COPY package.json ./ # buildkit (Layer 3):
- This layer copies the package.json and package-lock.json files into the container. The comment indicates that it's part of the build process using BuildKit. The size of this layer is 114B.
WORKDIR /app (Layer 2):
- This layer sets the working directory inside the container. It doesn't add any size to the image.
<missing> (Layers 1, 8-15):
- These layers are from the official Node.js base image. They include steps like setting environment variables, installing dependencies, and configuring the base image.
Analysis:🔬
Layers 1 to 7 are specific to your application and the Dockerfile you've written.
Layers 8 to 15 are part of the official Node.js base image and include the setup for Node.js, yarn, and other dependencies.
Summary:
Understanding the layers of a Docker image is crucial for optimizing build times, reducing image size, and ensuring consistency across different environments. By managing layers effectively, you can create efficient and reproducible Docker images for your applications. 🏗️🐳
Optimizing Docker Images🔋
Optimizing Docker images is crucial for improving build times, reducing image size, and enhancing overall efficiency. Here are some simple strategies to optimize Docker images:
1. Use a Minimal Base Image:🤏
- Start with a minimal base image that includes only the essentials needed for your application. Alpine Linux or other lightweight distributions are popular choices.
FROM alpine:latest
2. Consolidate RUN commands:🖇️
- Combine multiple
RUNcommands into a single command to reduce the number of layers. This minimizes the size of the image.
RUN apk update && \
    apk add package1 package2 && \
    rm -rf /var/cache/apk/*
3. Use Specific Tags for Base Images:😌
- Specify a version or tag for your base image to ensure consistency and avoid unexpected updates that may introduce changes. Trust me, This will save you a lot of headaches 😅
FROM node:14.17.5
4. Cleanup After Installations:♻️
- Remove unnecessary files and cleanup package managers after installations to reduce the image size.
RUN apk add --no-cache package1 && \
    rm -rf /var/cache/apk/*
5. Copy Only What's Necessary:😃
- Be selective when copying files into the image. Only include files required for the application to run. The other way, which is simple by the way, is to use the .dockerignore file and specify what you don't want to copy.
COPY app.js .
6. Use multi-stage builds:
Utilize multi-stage builds to create a smaller final image. Build dependencies in one stage and copy only necessary artifacts to the final stage. FYI: This will increase your performance and security in a significant way.
Advantages:
Smaller Image Size:
- The final image only contains the necessary artifacts and runtime dependencies, resulting in a smaller image size.
Enhanced Security:
- The production stage doesn't include unnecessary tools or dependencies used for building, reducing the attack surface and enhancing security.
Improved Build Speed:
- The build stage is optimized for speed, and since you only copy essential artifacts to the production stage, the overall build process is faster.
# Stage 1: Build Stage
FROM node:14.17.5 AS build
WORKDIR /app
COPY . .
RUN npm install && npm run build

# Stage 2: Production Stage
FROM node:14.17.5
WORKDIR /app
COPY --from=build /app/dist .
7. Minimize Image Layers:
- Limit the number of layers in your Dockerfile. Each layer contributes to the image size and build time.
8. Remove unnecessary tools: 🧹
- Remove development tools and dependencies not needed in the production image. These tools can add unnecessary size and some very serious issues!
9. Use .dockerignore:
- Create a
.dockerignorefile to exclude unnecessary files and directories from being copied into the image.
10. Explore smaller base images:🔍
- Explore specialized base images for specific use cases. For example, images like
node:alpineare smaller than their standard counterparts.
11. Optimize Dockerfile Instructions:⚙️
- Optimize Dockerfile instructions for better readability and maintainability. Use && for multiple commands in a single RUN instruction.
12. Regularly Update Base Images:
- Regularly update your base images to include security patches and improvements.
13. Remove unused layers:
- Periodically prune unused images and containers using
docker system pruneto reclaim disk space.
14. Consider Image Layer Caching:
- Be aware of Docker image layer caching. Ensure that frequently changing instructions are placed towards the end of the Dockerfile.
Okay, that was so much to take at once, but once you follow these techniques, it will save you a lot of headaches and time, plus some money🤑. But let me show you one last technique that can save you a lot of time.
Using the ARG variable:💫
Using ARG (Build-time variable) in a Dockerfile allows you to define variables that users can pass at build-time. This can be useful for creating flexible and easily customizable Dockerfiles. Here's how you can incorporate ARG in your Dockerfile for better maintainability:
# Use an official Node.js runtime as a base image
FROM node:14.17.5

# Define build-time variables
ARG APP_DIR=/app
ARG NODE_ENV=production

# Set the working directory
WORKDIR ${APP_DIR}

# Copy package.json and package-lock.json to the working directory
COPY package*.json ./

# Install application dependencies
RUN npm install --production

# Copy the application code to the working directory
COPY . .

# Expose port (useful for documentation purposes)
ARG PORT=3000
EXPOSE ${PORT}

# Define the command to run your application
CMD ["npm", "start"]

# Build-time variable usage example:
# docker build --build-arg NODE_ENV=development -t my-node-app .
ARG APP_DIR=/app: Defines a build-time variable namedAPP_DIRwith a default value of/app. You can change this variable during the build.ARG NODE_ENV=production: Defines a build-time variable namedNODE_ENVwith a default value ofproduction. Users can override this value during the build.WORKDIR ${APP_DIR}: Uses theAPP_DIRvariable to set the working directory. This ensures that subsequent commands use the specified directory.EXPOSE ${PORT}: Exposes a port, using thePORTvariable. While this is more for documentation (it doesn't publish the port), it demonstrates how variables can be used in various instructions.Build-time Variable Usage Example:
During the build, you can override the
NODE_ENVvariable:docker build --build-arg NODE_ENV=development -t my-node-app .
This article is getting way too long to follow, which is why we are moving to the last point, which is an important one.
Sharing Your Images Online💌
Sharing Docker images online, especially on Docker Hub, is a common practice for distributing and collaborating on containerized applications. Docker Hub is a cloud-based registry service that allows you to store and share Docker images. Here's a guide on how to share images on Docker Hub:
1. Create a Docker Hub account:🧩
- If you don't have a Docker Hub account, create one at Docker Hub. Sign in using your Docker Hub credentials.
2. Tag Your Local Image:🏷️
- Before pushing an image to Docker Hub, make sure to tag your local image appropriately. The tag usually includes your Docker Hub username and the repository name. Remember, you can also tag during development to skip this step.
docker tag local_image:tag dockerhub_username/repository_name:tag
For example, in my case, my username is iamlaurent:
docker tag my-node-app:latest iamlaurent/my-node-app:latest
3. Log in to Docker Hub:👨💻
- Use the
docker logincommand to log in to your Docker Hub account:
docker login
Enter your Docker Hub username and password when prompted.
4. Push the image to the Docker Hub:🫸
- Push the tagged image to Docker Hub using the
docker pushcommand:
docker push dockerhub_username/repository_name:tag
For example:
docker push iamlaurent/my-node-app:latest
This uploads your image to Docker Hub.
docker push iamlaurent/my-node-app:latest
The push refers to repository [docker.io/iamlaurent/my-node-app]
da3c8a72bee9: Pushed
e1aec1c16873: Pushed
635bf01a3992: Pushed
783f936e8483: Pushed
5afac210f009: Pushed
5fe0aa95fbb6: Mounted from library/node
0582d42a061a: Mounted from library/node
bd2ff4c4758c: Pushed
fb1bd2fc5282: Pushed
latest: digest: sha256:6ecc58951d8170f8f2a2fa5b05be48308f29e60a266e4f22bce2fc3e595fa19e size: 2195
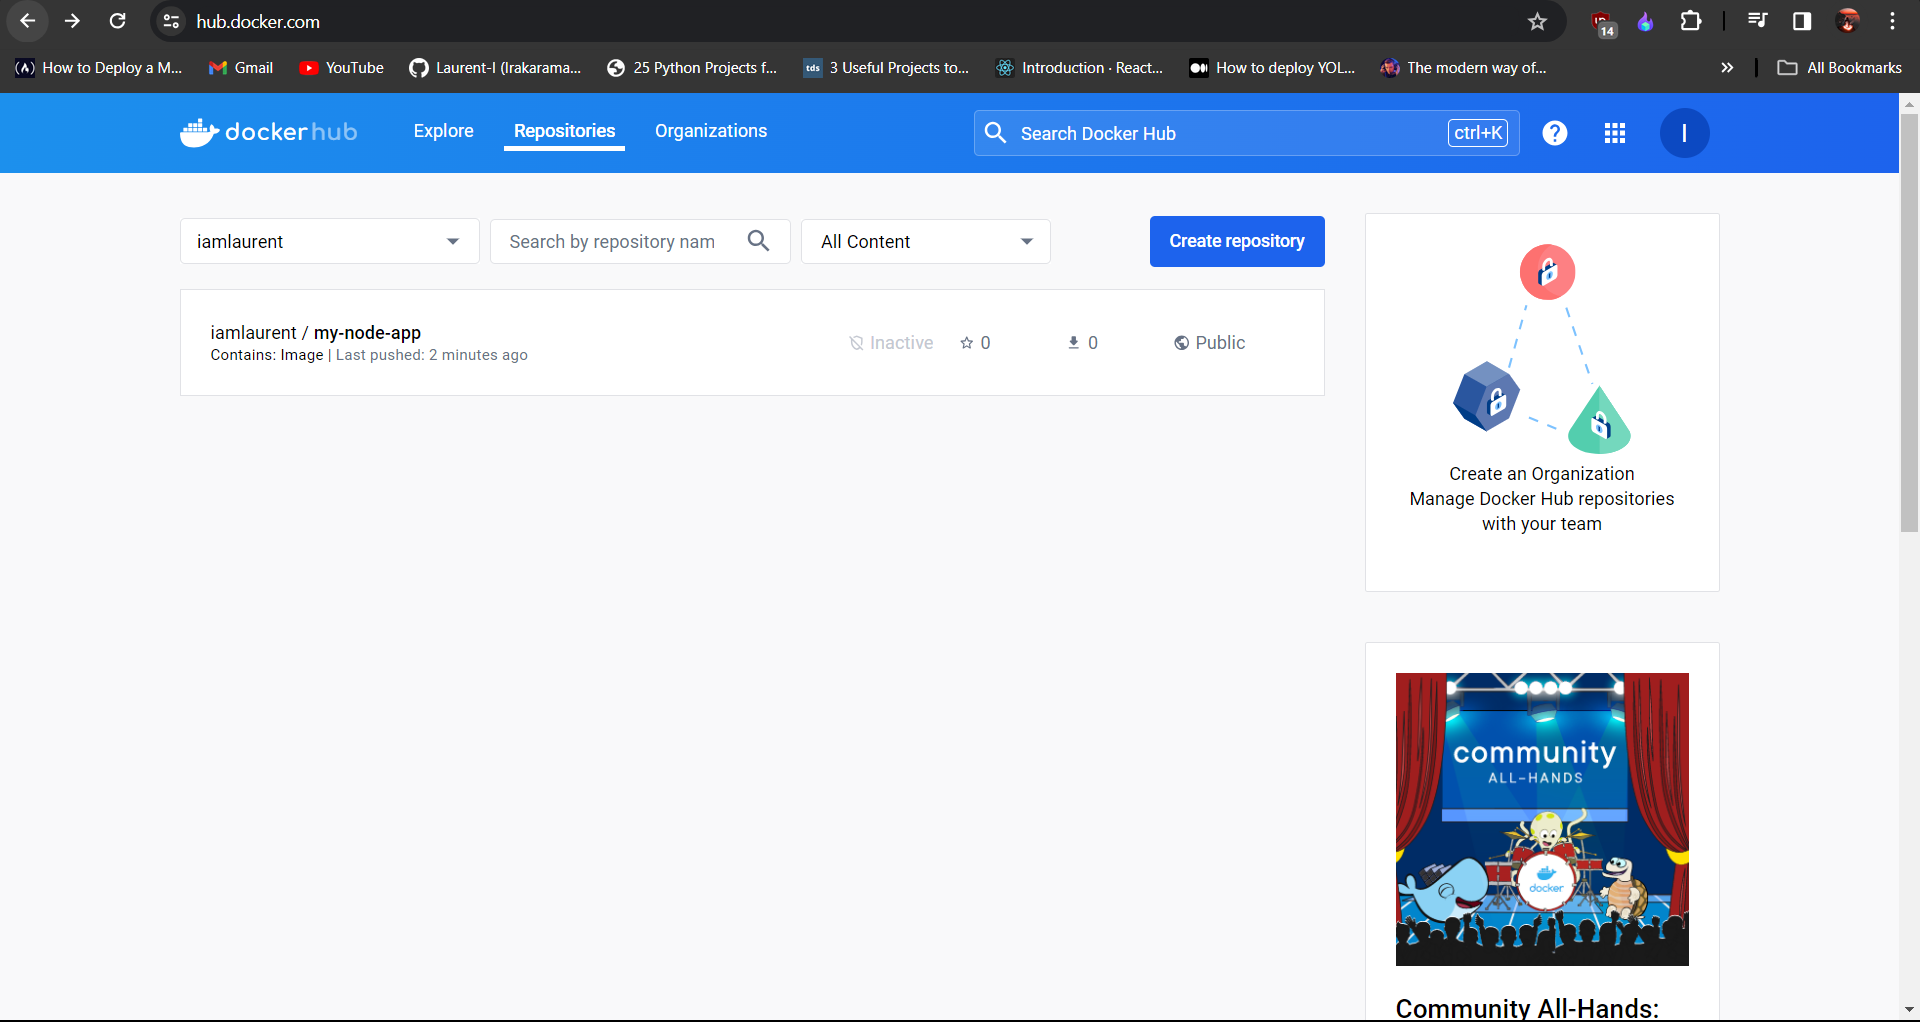
5. Check the uploaded image:✅
- Visit your Docker Hub repository on the Docker Hub website. You should see your uploaded image listed with details.
6. Pull the image on another machine:
- On another machine where you want to use the image, pull it from Docker Hub:
docker pull dockerhub_username/repository_name:tag
For example:
docker pull iamlaurent/my-node-app:latest
Additional Tips:🆕
Organize Repositories:
- Consider creating separate repositories on Docker Hub for different projects or versions to keep things organized.
Versioning:
- Use version tags (e.g.
v1.0,v2.0) for different releases to ensure versioned deployments.
- Use version tags (e.g.
Automated Builds:
- Docker Hub supports automated builds connected to your source code repository, ensuring that images are automatically updated when changes are pushed to the repository.
Visibility Settings:
- Docker Hub allows you to set the visibility of your repositories. You can choose between public (visible to everyone) and private (visible only to you and collaborators).
Wow, that was a long article with a lot of words and code to take in. If you made it here, I congratulate you🎉. Thank you for hanging in there and finishing this super long article. ✌🏽
Happy Coding and Teaching!! 🧑🏽💻


